Deepface realtime for using with a webcam or video sequences.
Download latest version here:
https://mega.nz/folder/m10iELBK#Y0H6BflF9C4k_clYofC7yA
Github Project here:

Deepface realtime for using with a webcam or video sequences.
Download latest version here:
https://mega.nz/folder/m10iELBK#Y0H6BflF9C4k_clYofC7yA
Github Project here:

There is a certain appeal to having characters that look hand-drawn or hand-painted. In a digital world, that means using a 2D animation app like Spine, ToonBoom, Ae, Moho, or others. Some other alternatives work with a hybrid of 2D and 3D objects simultaneously, like Bender’s Grease Pencil. You can also create a 2D flat character in a 3D app, like Cinema 4D or Maya. There are a lot of advantages to doing that, and some drawbacks too.
A new breakdown from James Crossley shows some of the methods he uses to get that classic 2D flat character look in Maya. Crossley plans to create a series of examinations covering character building, rigging, and animation using flat puppets in Maya. One of the benefits is having access to Maya’s animation and rigging toolset, not to mention the sheer speed of a 3D viewport.


Press copy.

A great tool for standalone denoise your renders PNG or JPG sequences supported.
https://github.com/DeclanRussell/NvidiaAIDenoiser


You will need to download Nvidia’s OPTIX and CUDA SDKs from the dev site.
“You will require an Nvidia driver of at least 465.84 or higher and an Nvidia GPU of Maxwell architecture or newer to use the OptiX denoiser.“

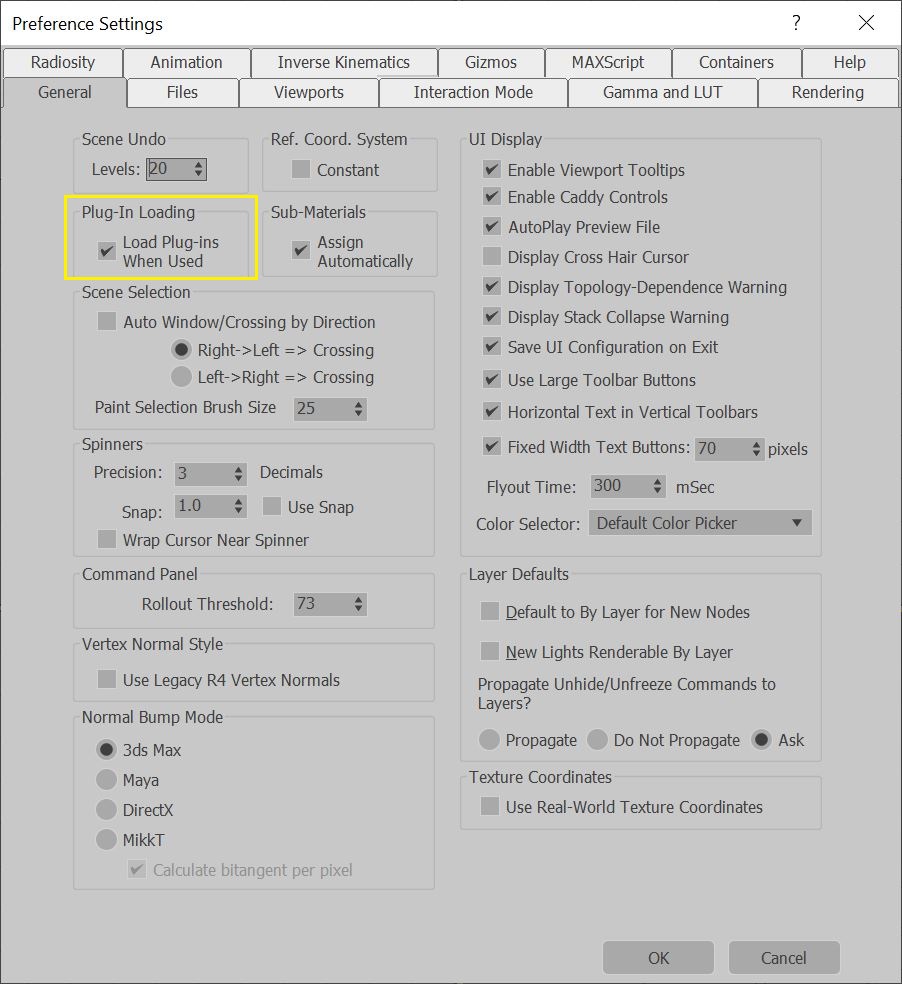
Found this thread for solving the sluggish UI on 3DS MAX.
3ds Max lags or shows a delay in performance, even on fast CPUs. This includes, but is not limited to Intel i9 and AMD ‘Ryzen Threadrippers’.
This includes clicking any area of the user interface or moving objects, animation playback (FPS, or frames per second) in the viewport.
When trying to move an object from point A to point B, it may take two – ten seconds to perform the action.
Includes, but is not limited to:
The solution may require one, or a combination of the following to resolve:
Go to the Script Controller entry in the ‘See Also’ section below to check 3ds Max for corrupted scripts that could affect performance.
Although it may seem contradictory, disabling Hyperthreading (for Intel CPUs) or SMT (simultaneous
multithreading, for AMD CPUs) may actually speed up 3ds Max performance.
Note: The Arnold renderer takes advantage of both Hyperthreading and SMT, so disable these settings only if getting the best performance from Arnold isn’t necessary.
In some instances, 3ds Max UI improvements may occur by setting a Qt (UI) environment variable in Windows:
For more information on the Qt variables, see: Qt 5 on Windows ANGLE and OpenGL.
Update Graphics Drivers
To install the most recent version of the video card driver, update the GPU from the manufacturer’s website:.
See the following articles:
Follow the steps in this article to optimize large scene for best performance in 3ds Max: How to optimize performance in large 3ds Max scenes .
If running in 4K resolution and encountering screen redraw issues (especially if running multiple monitors), consider lowering the screen resolution. See this Microsoft article for recommended screen settings:
.
In certain cases, having corrupted scene geometry can impair viewport performance. Try the following:
High poly objects will impact viewport performance. Use Xrefs where possible.

If you get the following errors when trying to pair the WF-1000XM3 on Windows 10:
The solution is to try any of these, it’s most likely that the device was paired but your Bluetooth device on windows is missing the aptX HD codecs, therefore it pairs but cannot play any audio.
Solution 1
Win10, go to Devices and Printers, right click LE_WH1000M3 or 1000MX3 properties then Services and select all services. Once you’ve done that, Audio service (shown as WF-1000XM3) should appear. Note, that once your headset will say that it has paired with PC, you also need to change audio Playback to Headset.
Download the aptX HD bluetooth enabled drivers
“
As much as the headphones may support it its not for granted that your pc is or if it has it installed, so here is a link with instructions: https://www.youtube.com/watch?v=3qr5o8x4LDQ
…and finally here is a download link to the install file: https://www.dell.com/support/home/sv-se/drivers/DriversDetails?driverId=100J9&fileId=3546946146&lwp=…“
Or download from here: cocoalopez.com/blog/uploads/Network_Application_100J9_WN32_17.1.1530.31_A00.EXE.zip
Taken from: https://community.sony.no/t5/portable-audio/wh-1000xm3-can-t-connect-with-windows-10/td-p/3756476

Disable audio enhancement
Audio enhancement is designed to make your system sound perfect. But things can go wrong somethings. To fix your sound stuttering problem, please perform:
If you don’t have an Enhancement tab here, the culprit is not enhancement then. Move on to the next fix.
Fix 2: Change audio formats
If your audio driver or software doesn’t support the current audio format you have, sound issues such as static or stuttering would happen. To fix it, you can try different audio formats:

Found this nifty utility that helps you set your headphones using the PC instead of the mobile app:
https://github.com/Plutoberth/SonyHeadphonesClient


Pretty nifty little tool that restores compressed anime and facial details.
https://arc.tencent.com/en/ai-demos/imgRestore
Face Restoration
https://arc.tencent.com/en/ai-demos/faceRestoration


https://github.com/cmdr2/stable-diffusion-ui
Amazing 1 click solution to run StableDiffusion on Windows directly from a localhost. Textprompts and image generation.

Existing 3D-aware facial generation methods face a dilemma in quality ver- sus editability: they either generate editable results in low resolution, or high quality ones with no editing flexibility. In this work, we propose a new approach that brings the best of both worlds together. Our system consists of three major components: (1) a 3D-semantics-aware generative model that produces view-consistent, disentangled face images and semantic masks; (2) a hybrid GAN inversion approach that initialize the latent codes from the semantic and texture encoder, and further optimized them for faithful reconstruction; and (3) a canonical editor that enables efficient manipulation of semantic masks in canonical view and producs high quality editing re- sults. Our approach is competent for many applications, e.g. free-view face drawing, editing and style control. Both quantitative and qualitative results show that our method reaches the state-of-the-art in terms of photorealism, faithfulness and efficiency.

Here’s a small collection of scripts i’ve made, downloaded, modified, etc to compress, edit, add, remux video files as well as converting mkv files without the need of re-rendering.
Copy the code and save as a .bat file, save it on your ffmpeg bin folder or any command line if ffmpeg was installed with its environment path.
To use the scripts, just drag and drop your video file on the .bat file you created.
Download ffmpeg from here: https://www.gyan.dev/ffmpeg/builds/ffmpeg-release-full.7z
In case FFMPEG is missing or the path is not configured, follow these steps.
Download the lastest “static” ffmpeg pack.
Browse in the archive up to the bin subfolder containing ffmpeg, ffprobe and ffplay executables. Uncompress the bin folder (in this example we’ll use C:\ffmpeg\bin)
Register ffmpeg, ffprobe & ffplay to environment variables
Through command lines:
Hit the windows key, write down cmd and press Enter and enter the following command, line after line:
set ffmpeg=C:\ffmpeg\bin set ffprobe=C:\ffmpeg\bin set ffplay=C:\ffmpeg\bin
Through user interface:
Go to:
My Computer/Environment variablesAdd Name: ffmpeg Value: C:\ffmpeg\bin Add Name: ffprobe Value: C:\ffmpeg\bin Add Name: ffplay Value: C:\ffmpeg\bin
You can draw the frame number on top of the video and render it as a new file.
rem @echo off
:again
cd /D %~p1
ffmpeg ^
-i "%~nx1" ^
-vf "drawtext=fontfile=/Windows/Fonts/courbd.ttf: text='Frame \: %%{eif\:n\:d\:2}': start_number=1: x=(w-tw)/2: y=h-(2*lh): fontcolor=white: fontsize=40: box=1: boxcolor=black@0.4: boxborderw=8" ^
-c:a copy ^
"%~p1%~n1_framenumbered.mov"
pause
if NOT ["%errorlevel%"]==["0"] goto:error
echo [92m%~n1 Done![0m
shift
if "%~1" == "" goto:end
goto:again
:error
echo [93mThere was an error. Please check your input file or report an issue on github.com/L0Lock/FFmpeg-bat-collection/issues.[0m
pause
exit 0
:end
cls
echo [92mEncoding succesful. This window will close after 10 seconds.[0m
timeout /t 10Reduce the size of your video to match a 100MB limit.
@echo off
:again
cd /D %~p0
SET output=%~p1%~n1_100MB.mp4
set cmd="ffprobe -v error -show_entries format=duration -of default=noprint_wrappers=1:nokey=1 %1 "
FOR /F "tokens=*" %%i IN (' %cmd% ') DO SET seconds=%%i
echo aaaa
echo aaaa
SET /A "totalBitrate=500000/seconds"
SET overheadBitrate=100
SET audioBitrate=96
SET /A "videoBitrate=totalBitrate-audioBitrate-overheadBitrate"
ffmpeg ^
-i %1 ^
-c:v libx264 ^
-b:v %videoBitrate%k ^
-pass 1 -b:a %audioBitrate%k ^
-f mp4 NUL && \
ffmpeg ^
-i %1 ^
-c:v libx264 ^
-b:v %videoBitrate%k ^
-pass 2 ^
-b:a %audioBitrate%k "%output%"
del /q ffmpeg2pass-*.log ffmpeg2pass-*.mbtree
if NOT ["%errorlevel%"]==["0"] goto:error
echo [92m%~n1 Done![0m
shift
if "%~1" == "" goto:end
goto:again
:error
echo [93mThere was an error. Please check your input file or report an issue on github.com/L0Lock/FFmpeg-bat-collection/issues.[0m
pause
exit 0
:end
cls
echo [92mEncoding succesful. This window will close after 10 seconds.[0m
timeout /t 10Reduce the video size to match Discord limit.
@echo off
:again
cd /D %~p0
SET output=%~p1%~n1_Discorded.mp4
set cmd="ffprobe -v error -show_entries format=duration -of default=noprint_wrappers=1:nokey=1 %1 "
FOR /F "tokens=*" %%i IN (' %cmd% ') DO SET seconds=%%i
echo aaaa
echo aaaa
SET /A "totalBitrate=64000/seconds"
SET overheadBitrate=100
SET audioBitrate=96
SET /A "videoBitrate=totalBitrate-audioBitrate-overheadBitrate"
ffmpeg ^
-i %1 ^
-c:v libx264 ^
-b:v %videoBitrate%k ^
-pass 1 -b:a %audioBitrate%k ^
-f mp4 NUL && \
ffmpeg ^
-i %1 ^
-c:v libx264 ^
-b:v %videoBitrate%k ^
-pass 2 ^
-b:a %audioBitrate%k "%output%"
del /q ffmpeg2pass-*.log ffmpeg2pass-*.mbtree
if NOT ["%errorlevel%"]==["0"] goto:error
echo [92m%~n1 Done![0m
shift
if "%~1" == "" goto:end
goto:again
:error
echo [93mThere was an error. Please check your input file or report an issue on github.com/L0Lock/FFmpeg-bat-collection/issues.[0m
pause
exit 0
:end
cls
echo [92mEncoding succesful. This window will close after 10 seconds.[0m
timeout /t 10Reduce the video size to match Facebook limit.
@echo off
:again
cd /D %~p0
SET output=%~p1%~n1_Messengered.mp4
set cmd="ffprobe -v error -show_entries format=duration -of default=noprint_wrappers=1:nokey=1 %1 "
FOR /F "tokens=*" %%i IN (' %cmd% ') DO SET seconds=%%i
echo aaaa
echo aaaa
SET /A "totalBitrate=160000/seconds"
SET overheadBitrate=100
SET audioBitrate=96
SET /A "videoBitrate=totalBitrate-audioBitrate-overheadBitrate"
ffmpeg ^
-i %1 ^
-c:v libx264 ^
-b:v %videoBitrate%k ^
-pass 1 -b:a %audioBitrate%k ^
-f mp4 NUL && \
ffmpeg ^
-i %1 ^
-c:v libx264 ^
-b:v %videoBitrate%k ^
-pass 2 ^
-b:a %audioBitrate%k "%output%"
del /q ffmpeg2pass-*.log ffmpeg2pass-*.mbtree
if NOT ["%errorlevel%"]==["0"] goto:error
echo [92m%~n1 Done![0m
shift
if "%~1" == "" goto:end
goto:again
:error
echo [93mThere was an error. Please check your input file or report an issue on github.com/L0Lock/FFmpeg-bat-collection/issues.[0m
pause
exit 0
:end
cls
echo [92mEncoding succesful. This window will close after 10 seconds.[0m
timeout /t 10Reduce the video size to match Whatsapp limit.
@echo off
:again
cd /D %~p0
SET output=%~p1%~n1_Whatsapped.mp4
set cmd="ffprobe -v error -show_entries format=duration -of default=noprint_wrappers=1:nokey=1 %1 "
FOR /F "tokens=*" %%i IN (' %cmd% ') DO SET seconds=%%i
echo aaaa
echo aaaa
SET /A "totalBitrate=260000/seconds"
SET overheadBitrate=100
SET audioBitrate=96
SET /A "videoBitrate=totalBitrate-audioBitrate-overheadBitrate"
ffmpeg ^
-i %1 ^
-c:v libx264 ^
-b:v %videoBitrate%k ^
-pass 1 -b:a %audioBitrate%k ^
-f mp4 NUL && \
ffmpeg ^
-i %1 ^
-c:v libx264 ^
-b:v %videoBitrate%k ^
-pass 2 ^
-b:a %audioBitrate%k "%output%"
del /q ffmpeg2pass-*.log ffmpeg2pass-*.mbtree
if NOT ["%errorlevel%"]==["0"] goto:error
echo [92m%~n1 Done![0m
shift
if "%~1" == "" goto:end
goto:again
:error
echo [93mThere was an error. Please check your input file or report an issue on github.com/L0Lock/FFmpeg-bat-collection/issues.[0m
pause
exit 0
:end
cls
echo [92mEncoding succesful. This window will close after 10 seconds.[0m
timeout /t 10Downmix 5.1 audio to Stereo for MKV files with 5.1 audio that can’t be played.
@echo off

cd /D %~p0


echo Convert Audio to Stereo ...
for %%i in (%*) do if not exist "%~p1%%~ni_Stereo.mkv" (
   ffmpeg.exe -i "%%~i" -map 0 -c copy -c:a aac -ac 2 "%~p1%%~ni_Stereo.mkv"
)
popd
echo Done..This script extracts the audio track #2 from the mkv you drop, if you need to extract track #1 then modify the “-map 0:a:1” to “-map 0:a:0” (track begin at 0 instead of 1)
@echo off

cd /D %~p0


echo Extracting audio track 2 ...
for %%i in (%*) do if not exist "%~p1%%~ni_Audio.mp4" (
   ffmpeg -i "%%~i" -map 0:a:1 -c copy -c:a aac -ac 2 "%~p1%%~ni_Audio.mp4"
)
popd
echo Done..
@echo off

cd /D %~p0


echo Delay audio by 1.4 seconds ...
for %%i in (%*) do if not exist "%~p1%%~ni_delayed.mp4" (
   ffmpeg.exe -i "%%~i" -itsoffset 1.4 -i "%%~i" -map 0:v -map 1:a -c copy "%~p1%%~ni_delayed.mp4"
)
popd
echo Done..
@echo off
:again
:: To change the resolution, change the SquareSize value above (just after the =). Default is 600.
set SquareSize=600
ffmpeg -i "%~1" ^
-c:v libx264 -crf 23 -filter_complex "[0:v]split=2[blur][vid];[blur]scale=%SquareSize%:%SquareSize%:force_original_aspect_ratio=increase,crop=%SquareSize%:%SquareSize%,boxblur=luma_radius=min(h\,w)/20:luma_power=1:chroma_radius=min(cw\,ch)/20:chroma_power=1[bg];[vid]scale=%SquareSize%:%SquareSize%:force_original_aspect_ratio=decrease[ov];[bg][ov]overlay=(W-w)/2:(H-h)/2" -profile:v baseline -level 3.0 -pix_fmt yuv420p -preset faster -tune fastdecode ^
-c:a aac -ac 2 -b:a 128k ^
-movflags faststart ^
"%~p1%~n1_Instagramized.mp4" -y
if NOT ["%errorlevel%"]==["0"] goto:error
echo [92m%~n1 Done![0m
shift
if "%~1" == "" goto:end
goto:again
:error
echo [93mThere was an error. Please check your input file or report an issue on github.com/L0Lock/FFmpeg-bat-collection/issues.[0m
pause
exit 0
:end
cls
echo [92mEncoding succesful. This window will close after 10 seconds.[0m
timeout /t 10
Other codes can be found here:
Convert any OGV file to an MP4 with fast conversion and using h264, just drag and drop the file into the script.
@echo off
setlocal enabledelayedexpansion

REM Check if FFmpeg is installed
where ffmpeg >nul 2>nul
if %errorlevel% neq 0 (
    echo FFmpeg is not installed or not in the system PATH. Please install FFmpeg and try again.
    pause
    exit /b 1
)

REM Check if a file is provided
if "%~1" == "" (
    echo Please drag and drop an OGV file onto this script.
    pause
    exit /b 1
)

REM Input and output file paths with quotes
set "inputFile=%~1"
set "outputFile=%~dpn1.mp4"

REM Run FFmpeg command with quotes around file paths
ffmpeg -i "!inputFile!" -c:v libx264 -crf 22 -c:a aac -b:a 128k -strict -2 "!outputFile!"

REM Check FFmpeg exit code
if !errorlevel! neq 0 (
    echo An error occurred during conversion.
    pause
    exit /b 1
)

echo Conversion successful. Output file: "!outputFile!"
pause
Convert any video to a timelapse by using every 15th frames.
@echo off
setlocal enabledelayedexpansion

REM Check if FFmpeg is installed
where ffmpeg >nul 2>nul
if %errorlevel% neq 0 (
    echo FFmpeg is not installed or not in the system PATH. Please install FFmpeg and try again.
    pause
    exit /b 1
)

REM Check if a file is provided
if "%~1" == "" (
    echo Please drag and drop an OGV file onto this script.
    pause
    exit /b 1
)

REM Input and output file paths with quotes
set "inputFile=%~1"
set "outputFile=%~dpn1_timelapse.mp4"

REM Run FFmpeg command with quotes around file paths

ffmpeg -i "!inputFile!" -vf framestep=15,setpts=N/60/TB -r 60 -vcodec libx264 -an "!outputFile!"


REM Check FFmpeg exit code
if !errorlevel! neq 0 (
    echo An error occurred during conversion.
    pause
    exit /b 1
)

echo Conversion successful. Output file: "!outputFile!"
pause
Downscale video to match 720p resolution.
@echo off
setlocal enabledelayedexpansion

REM Check if FFmpeg is installed
where ffmpeg >nul 2>nul
if %errorlevel% neq 0 (
    echo FFmpeg is not installed or not in the system PATH. Please install FFmpeg and try again.
    pause
    exit /b 1
)

REM Check if a file is provided
if "%~1" == "" (
    echo Please drag and drop an OGV file onto this script.
    pause
    exit /b 1
)

REM Input and output file paths with quotes
set "inputFile=%~1"
set "outputFile=%~dpn1_720p.mp4"

REM Run FFmpeg command with quotes around file paths
ffmpeg -i "!inputFile!"  -vf scale=1280:720 -preset slow -crf 18 "!outputFile!"

REM Check FFmpeg exit code
if !errorlevel! neq 0 (
    echo An error occurred during conversion.
    pause
    exit /b 1
)

echo Conversion successful. Output file: "!outputFile!"
pause
Convert any video to a jpg sequence.
@echo off
setlocal EnableExtensions DisableDelayedExpansion

REM Check if the batch file is called with at least one non-empty argument string.
if "%~1" == ""  echo INFO: Drag an MP4 file onto this script to begin frame extraction.& pause & exit /B

set "inputFile=%~1"

REM Create the subdirectory input in the directory named after the video file.
md "%~dpn1\input" 2>nul
if not exist "%~dpn1\input\" echo ERROR: Could not create the directory: "%~dpn1\input"& pause & exit /B 2

REM Extract frames from the MP4 file.
ffmpeg.exe -i "%~1" -qscale:v 1 -qmin 1 -qmax 1 -vsync 0 "%~dpn1\input\image%%03d.jpg"
if errorlevel 1 rd "%~dpn1\input" 2>nul & echo ERROR: Failed to extract the frames from: "%~1"& pause & exit /B 1

echo Extraction complete.
pause
endlocalYou can choose a specific frame from the video manually by specifying its timestamp. If you want to capture the frame at 00:15, add -ss 00:00:15 before your input video to take a screenshot at the 15th second of the video.
@echo off
setlocal enabledelayedexpansion

REM Check if FFmpeg is installed
where ffmpeg >nul 2>nul
if %errorlevel% neq 0 (
    echo FFmpeg is not installed or not in the system PATH. Please install FFmpeg and try again.
    pause
    exit /b 1
)

REM Check if a file is provided
if "%~1" == "" (
    echo Please drag and drop an OGV file onto this script.
    pause
    exit /b 1
)

REM Input and output file paths with quotes
set "inputFile=%~1"
set "outputFile=%~dpn1.png"

REM Run FFmpeg command with quotes around file paths
ffmpeg -ss 00:00:05 -i "!inputFile!" -frames:v 1 "!outputFile!"

REM Check FFmpeg exit code
if !errorlevel! neq 0 (
    echo An error occurred during conversion.
    pause
    exit /b 1
)

echo Conversion successful. Output file: "!outputFile!"
pause@echo off
REM Input and output file paths with quotes
:: The script expects the first parameter to be the image file.
set "imageFile=%~1"
:: Extract the filename without extension for the output video name.
for %%A in ("%imageFile%") do set "filename=%%~nA"
set "inputFile=%filename%.jpg"
set "outputFile=%filename%.mp4"
ffmpeg ^
-framerate 24 ^
-start_number 1 ^
-i "TURN_%%04d.jpg" ^
-c:v libx264 -pix_fmt yuv420p -crf 17 ^
-preset faster -tune fastdecode ^
"TURNTABLE.mp4"
if NOT ["%errorlevel%"]==["0"] goto:error
echo [92m%~n1 Done![0m
shift
if "%~1" == "" goto:end
goto:again
:error
echo [93mThere was an error. Please check your input file or report an issue on github.com/L0Lock/FFmpeg-bat-collection/issues.[0m
pause
exit 0
:end
cls
echo [92mEncoding succesful. This window will close after 2 seconds.[0m
timeout /t 2